Key things every frontend developer should know about APIs.

As front-end developers we often ignore the science that goes behind building a useful and well designed API. “That is the job of the backend guy” we say, “I should just know how to use it”. Which is a completely incorrect. To understand how an API is designed and to be able to build one from scratch teaches us a lot of things about an API ( mostly REST APIs) that we wouldn’t normally know so I highly recommend everyone fiddle around with building an API from scratch.
As Phil Sturgeon famously said “Everyone And Their Dog Wants An API, So You Should Probably Learn How To Build Them.” In his book Build APIs you won’t hate. which is another great resource to learn this.
Every application (or service) has a frontend and a backed. The frontend is the part of the application that receives input from a client. The backend is the part of the application that processes information, such as processing a payment or looking up customer information. In most cases, the backend also returns the result of its processing to the frontend so it can be passed back to the client. For example, an application using Square APIs might have a frontend that users interact with to provide credit card information and a backend that use Square APIs to charge their cards for purchases.
What are APIs?
API is an acronym that stands for Application Programming Interface and according to wikipedia, an application programming interface (API) is a computing interface which defines interactions between multiple software intermediaries. Its a set of functions and procedures that allows the creation of applications by accessing the features or data of an operating system, application, or other service.
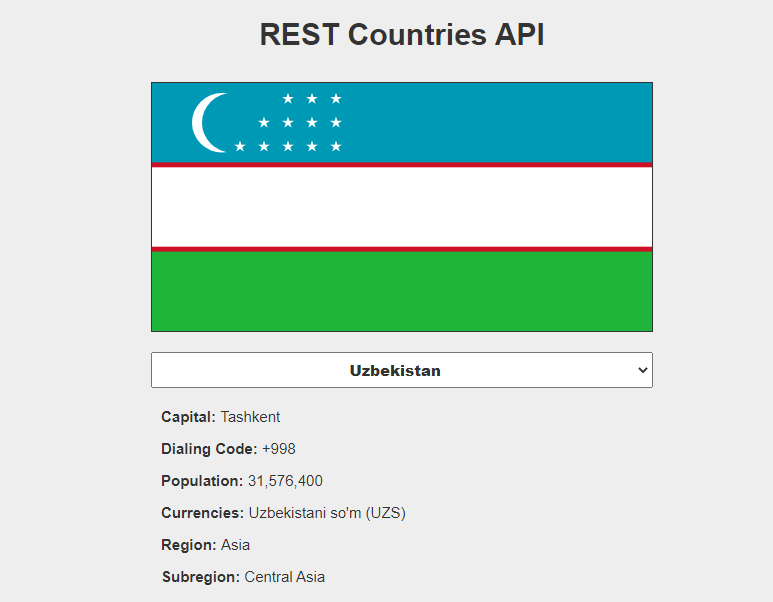
Using an API allows you to make any website or web application more exciting and dynamic than what you can accomplish with html, CSS and JavaScript by themselves. For this project, we will be using the restcountries API (https://restcountries.eu/) to create Country-selection website. This means that we can use an API to get data from an outside source which is very helpful, save time and make our work easier.
Getting Started
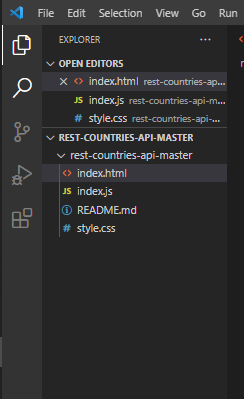
First set up a basic structure for our project in any editor of your choice e.g. Vscode, sublime, bracket etc. Create a directory (folder) Inside the directory you need the following three files: index.html index.css index.js See what it should look like:
Coding up our files
The content of our web page is going to be made up mostly of images generated in our JavaScript file but we do need to set up a basic structure of our web page using some html and CSS
In your index.html file enter the following code:
<!DOCTYPE html>
<html>
  <head>
    <title>REST Countries API</title>
    <link rel="stylesheet" href="style.css">
    <script src="index.js"></script>
  </head>
  <body>
    <h1>REST Countries API</h1>
    <div id="main-container">
      <div id="flag-container">
        <img src="" alt="">
      </div>
      <div id="info-container">
        <select id="countries"></select>
        <p>Capital: <span id="capital"></span></p>
        <p>Dialing Code: <span id="dialing-code"></span></p>
        <p>Population: <span id="population"></span></p>
        <p>Currencies: <span id="currencies"></span></p>
        <p>Region: <span id="region"></span></p>
        <p>Subregion: <span id="subregion"></span></p>
      </div>
    </div>
  </body>
</html>
In the html code above, notice that there is a section of it that says
* {
  box-sizing: border-box;
}
body {
  font-family: Helvetica, Arial, sans-serif;
  font-size: 15px;
  color: #333;
  background-color: #eee;
}
h1 {
  text-align: center;
}
#main-container {
  width: 502px;
  margin: 30px auto;
  padding: 0;
}
#flag-container {
  height: 250px;
  background-color: #fff;
  border: 1px solid #333;
}
#flag-container img {
  display: block;
  width: 100%;
  height: 100%;
}
#info-container select {
  display: block;
  margin: 20px auto;
  padding: 5px;
  min-width: 100%;
  color: #333;
  font-size: 15px;
  font-weight: 900;
  text-align-last: center;
}
#info-container p {
  padding: 0 10px;
  font-weight: 600;
}
#info-container p span {
  font-weight: normal;
}

@media (max-width: 768px) {
  body { font-size: 12px; }
  #main-container { width: 342px; }
  #flag-container { height: 172px; }
  #info-container select { font-size: 12px; font-weight: 600; }
}
Making our Request to the API
So we’re finally ready to start working with APIs in our JavaScript file… But before we get into the code there are a few more things I would like to tell you about using the restcountries API. In order to use the restcountries API in JavaScript, you need to learn how to use the Fetch method . Note that some API may require you to register for an API key. So what is the Fetch Method? The Fetch method is a method provided by the Fetch API that is built into the browser. It is used to get access to data through the use of the HTTP protocol, which the system used to transfer files throughout the internet. Below is a snippet of JavaScript code that will show you the syntax of how to make a request using the Fetch method.
const requestUrl = "url of whatever you want to make a request to";
fetch(requestUrl)
.then(response => response.json())
.then(data => {
   // do something with the data the API has returned
})
Okay now let me explain what is going on in the code above.
In the first line of code we have defined a variable that contains the url of the API we would like to make a request to. In the second line, we started the fetch request with the fetch method. It is important to note that the fetch method takes 2 arguments (the 2nd argument is optional). If we only use one argument the request will default to a GET request; if we use the 2nd argument, we have access to all the other requests types. So let’s just say we decided to log the result of fetch(requestUrl) with a valid url as an argument to the browser console using console.log(). When logged to the console we will get back a promise object. A promise is a special JavaScript Object, that will allow us to receive our data from the fetch request if it is successful or execute some snippet of code if the requested data fails to get back to us.
Since our fetch returns a promise object, we have access to the following three methods: .then(callback) which is is used when the promise is fulfilled (success) .catch(callback) which is used when the promise is rejected (fail) .finally(callback) happens on both a fulfilled and rejected promise In the above code snippet we use .then() to allow our code to do something with a successful promise. Our .then() method, and all other methods of promise objects, takes a callback function as an argument. It is considered best practice to use an ES6 arrow function as a callback function so we use it in both of our .then() methods. As you might have noticed, we chained two .then() method onto our fetch request; the reason why we did this is because the result of calling our first .then()on the promise returned from fetch()is actually another promise object! Because our .then() returns another promise object, we have to use another .then() on it to get access to our data from our api request. Lastly I would like you to look at the callback functions inside each of the .then() method invocations . Inside the first .then() we put: response => response.json() What this does is allow us to get access to our data from the second promise in the form of a JavaScript object. You need to include this part in your fetch request in order to get back the data you want as a result for you to use in the callback of your second .then()
Let’s Finally Make Our Request Below is code snippet of the JavaScript code used for this project
// Global Variables
const countriesList = document.getElementById("countries");
let countries;

// Event Listeners
countriesList.addEventListener("change", newCountrySelection);


function newCountrySelection(event) { //the newCountrySelection immediately takes the event as parameter
  displayCountryInfo(event.target.value);

}


fetch("https://restcountries.eu/rest/v2/all")
.then(res => res.json())
.then(data => initialize(data))
.catch(err => console.log("Error:", err));

function initialize(countriesData) {
  countries = countriesData;
  let options = "";

  countries.forEach(country => options+=`<option value="${country.alpha3Code}">${country.name}</option>`);
  countriesList.innerHTML = options;
  // console.log(countriesList);
  countriesList.selectedIndex = Math.floor(Math.random()*countriesList.length);
  displayCountryInfo(countriesList[countriesList.selectedIndex].value);
}

function displayCountryInfo(countryByAlpha3Code) { //display the listed info of the selected country
  const countryData = countries.find(country => country.alpha3Code === countryByAlpha3Code);
  document.querySelector("#flag-container img").src = countryData.flag;
  document.querySelector("#flag-container img").alt = `Flag of ${countryData.name}`;
  document.getElementById("capital").innerHTML = countryData.capital;
  document.getElementById("dialing-code").innerHTML = `+${countryData.callingCodes[0]}`;
  document.getElementById("population").innerHTML = countryData.population.toLocaleString("en-US");
  document.getElementById("currencies").innerHTML = countryData.currencies.filter(c => c.name).map(c => `${c.name} (${c.code})`).join(", ");
  document.getElementById("region").innerHTML = countryData.region;
  document.getElementById("subregion").innerHTML = countryData.subregion;
}
Now let me explain what the code in this snippet is doing. In the first line we got access to the following tag in our html code:
The intial first display, newcountryselection will show the country selected at random via the onload event. The newCountrySelection immediately takes the event as parameter and calls & return fxn displayCountryInfo passing in the event.target.value. This will only display the country of the eventtarget for initaial display
Let’s take a closer look at the string stored inside our fetch(). Inside it, we have a string of the url of a request to be used in. The main url used in all requests to the restcountries API is "https://restcountries.eu/rest/v2/all" and it is used in every API call that we make to restcountries. Everything we put after the main url is called an API endpoint, and each endpoint will allow us to access a different piece of restcountries’s database.
The endpoint that we are using in request will allow us to search restcountries’s database for all data within the API .
It is important to note here than when we have access to our data from the second .then() , we should make sure to log the result of that data to the console to see what kind of data structure we are working with. This is a great practice to have as you should always be checking to see what form your data comes in.
Inside our second .then() method we call a function that we made later in our code that takes the data from restcountries and stores it for further operation.
The stored data is then put first in a temporary variable i.e countries, then create a variable option and put i.e countriesList for each country inside variable countries put option variable inside one by one(+=) then put the option variable containing the i.e countriesList //NOTE: option value contains a specific group of country called alpha3code //NOTE: for the initaial display,selection is done by window-onload event, but this is done by a click event. The Function displayCountryInfo(countryByAlpha3Code) displays the listed info of the selected country as shown below.
Adding this code snippet will make our page look like this: